实测机器:Windows 10、RTX 4060 Ti 8GB、Ryzen 7 7800X3D、32GB 内存D:\AI\MiniMax-H3
4060 Ti 8GB 可以在本地跑 MiniMax H3。
我已经在这台电脑上跑通文生视频、图生视频和原生音频。原版工作流用 20 步,装上 Turbo LoRA 后可以降到 6~8 步。8GB 显存的麻烦也很明显:模型远大于显存,只能边算边卸载,时长和分辨率稍微往上加,速度就会掉得很快。
第一次安装时,我手动创建目录、装依赖,再逐个下载四个模型。过程不难,步骤太碎。为了让后面的人少敲几十条命令,我把这部分整理成了一份 PowerShell 脚本。
这篇文章只讲两件事:怎么把 H3 装起来,以及 4060 Ti 8GB 怎么设置才不会把时间浪费在无效生成上。
01|我的配置和模型选择 实测环境:
1
2
3
4
5
6
7
系统:Windows 10 64位 CPU:AMD Ryzen 7 7800X3D 内存:32GB 显卡:NVIDIA RTX 4060 Ti 8GB Python:3.12.10 PyTorch:2.13.0+cu130 ComfyUI:0.33.0
启动日志里能看到:
1
2
3
4
Total VRAM 8188 MB Total RAM 31965 MB DynamicVRAM support detected and enabled Using async weight offloading with 2 streams
H3 主模型有 20.97GB,整张显卡只有 8GB 显存。ComfyUI 会把权重留在内存,需要时再搬到显存,所以这套配置能跑,但不可能像模型完整驻留显存那样快。
我选的文件如下:
1
2
3
4
5
主模型:minimax_h3_fl2va_pruned_int8_convrot.safetensors 文本编码器:qwen3vl_32b_minimax_h3_nvfp4_awq.safetensors 视频 VAE:minimax_h3_video_vae_fp16.safetensors 音频 VAE:minimax_h3_audio_vae_fp32.safetensors Turbo LoRA:minimax_h3_turbo_v4_step600_ema.safetensors
五个文件合计约 43.3GB。算上 Python、ComfyUI、下载缓存和生成结果,D 盘最好空出 70GB 以上,100GB 更踏实。
02|运行前准备 开始之前,先确认三件事:
NVIDIA 驱动已经安装,运行 nvidia-smi 能看到显卡信息。
装好 Python 3.12。安装时勾选 Add Python to PATH。
D 盘至少留出 70GB,建议留 100GB。
打开 PowerShell,依次运行:
1 2 3 nvidia-smi py -3 .12 --version Get-PSDrive D
如果第二条命令找不到 Python,先解决 Python 的安装或环境变量问题,再运行后面的脚本。否则脚本会在创建虚拟环境时直接停下。
03|一键安装 MiniMax H3 把下面代码保存为:
1 install_minimax_h3_4060ti_8gb.ps1
脚本默认安装到 D:\AI\MiniMax-H3。已经下载完成且体积正确的模型会被跳过,下载中断后重新运行即可续传。
1
2
3
4
5
6
7
8
9
10
11
12
13
14
15
16
17
18
19
20
21
22
23
24
25
26
27
28
29
30
31
32
33
34
35
36
37
38
39
40
41
42
43
44
45
46
47
48
49
50
51
52
53
54
55
56
57
58
59
60
61
62
63
64
65
66
67
68
69
70
71
72
73
74
75
76
77
78
79
80
81
82
83
84
85
86
87
88
89
90
91
92
93
94
95
96
97
98
99
100
101
102
103
104
105
106
107
108
109
110
111
112
113
114
115
116
117
118
119
120
121
122
123
124
125
126
127
128
129
130
131
132
133
134
135
136
137
138
139
140
141
142
143
144
145
146
147
148
149
150
151
152
153
154
155
156
157
158
159
160
161
162
163
164
165
166
167
168
169
170
171
172
173
174
175
176
177
178
179
180
181
182
183
184
185
186
187
188
189
190
191
192
193
194
195
196
197
198
199
200
201
202
203
204
205
206
207
208
209
210
211
212
213
214
215
216
217
218
219
220
221
222
223
224
225
226
227
228
229
230
231
232
$ErrorActionPreference = "Stop" $ProgressPreference = "SilentlyContinue" Add-Type -AssemblyName System.IO.Compression.FileSystem$InstallRoot = "D:\AI\MiniMax-H3" $AppRoot = Join-Path $InstallRoot "app" $ComfyRoot = Join-Path $AppRoot "ComfyUI-master" $DownloadsRoot = Join-Path $InstallRoot "downloads" $VenvRoot = Join-Path $InstallRoot "venv" $VenvPython = Join-Path $VenvRoot "Scripts\python.exe" $HfHost = "https://huggingface.co" $DiffusionRoot = Join-Path $ComfyRoot "models\diffusion_models" $TextEncoderRoot = Join-Path $ComfyRoot "models\text_encoders" $VaeRoot = Join-Path $ComfyRoot "models\vae" $LoraRoot = Join-Path $ComfyRoot "models\loras" function Write-Step ([string]$Message ) Write-Host "`n[$ (Get-Date -Format 'HH:mm:ss')] $Message " -ForegroundColor Cyan } function Download-File param ( [Parameter (Mandatory = $true )][string ]$Url , [Parameter (Mandatory = $true )][string ]$Destination , [long ]$ExpectedSize = 0 ) $parent = Split-Path -Parent $Destination New-Item -ItemType Directory -Force -Path $parent | Out-Null if (Test-Path -LiteralPath $Destination ) { $currentSize = (Get-Item -LiteralPath $Destination ).Length if ($ExpectedSize -gt 0 -and $currentSize -eq $ExpectedSize ) { Write-Host "跳过已完成文件:$ (Split-Path -Leaf $Destination )" return } if ($ExpectedSize -eq 0 -and [IO.Path ]::GetExtension($Destination ) -eq ".zip" ) { try { $archive = [IO.Compression.ZipFile ]::OpenRead($Destination ) $archive .Dispose() Write-Host "跳过可正常打开的压缩包:$ (Split-Path -Leaf $Destination )" return } catch { Write-Host "压缩包不完整,尝试续传:$ (Split-Path -Leaf $Destination )" } } if ($ExpectedSize -gt 0 -and $currentSize -gt $ExpectedSize ) { throw "文件体积异常,请删除后重试:$Destination " } Write-Host "继续下载:$ (Split-Path -Leaf $Destination )(已有 $currentSize 字节)" } & curl.exe -L --fail --retry 8 --retry-delay 5 -C - -o $Destination $Url if ($LASTEXITCODE -ne 0 ) { throw "下载失败:$Url " } if ($ExpectedSize -gt 0 ) { $finalSize = (Get-Item -LiteralPath $Destination ).Length if ($finalSize -ne $ExpectedSize ) { throw "文件体积不符:$Destination ,实际 $finalSize ,预期 $ExpectedSize " } } } Write-Step "检查运行环境" if (-not [Environment ]::Is64BitOperatingSystem) { throw "需要 64 位 Windows。" } if (-not (Get-Command py.exe -ErrorAction SilentlyContinue)) { throw "没有找到 Python Launcher。请先安装 Python 3.12,并勾选 Add Python to PATH。" } & py.exe -3 .12 -c "import sys; print(sys.version)" | Out-Host if ($LASTEXITCODE -ne 0 ) { throw "没有找到 Python 3.12。" } if (-not (Get-Command curl.exe -ErrorAction SilentlyContinue)) { throw "没有找到 Windows curl.exe。" } $driveName = [IO.Path ]::GetPathRoot($InstallRoot ).TrimEnd("\" ).TrimEnd(":" )$drive = Get-PSDrive -Name $driveName $freeGB = [math ]::Round($drive .Free / 1 GB, 1 )Write-Host "D盘可用空间:$freeGB GB" $modelFiles = @ ( @ { Path = Join-Path $DiffusionRoot "minimax_h3_fl2va_pruned_int8_convrot.safetensors" ; Size = 20970379616 }, @ { Path = Join-Path $TextEncoderRoot "qwen3vl_32b_minimax_h3_nvfp4_awq.safetensors" ; Size = 15687142551 }, @ { Path = Join-Path $VaeRoot "minimax_h3_video_vae_fp16.safetensors" ; Size = 5207808496 }, @ { Path = Join-Path $VaeRoot "minimax_h3_audio_vae_fp32.safetensors" ; Size = 605254808 }, @ { Path = Join-Path $LoraRoot "minimax_h3_turbo_v4_step600_ema.safetensors" ; Size = 779849816 } ) $requiredBytes = 10 GBforeach ($modelFile in $modelFiles ) { $existingSize = 0 if (Test-Path -LiteralPath $modelFile .Path) { $existingSize = (Get-Item -LiteralPath $modelFile .Path).Length } $requiredBytes += [math ]::Max(0 , $modelFile .Size - $existingSize ) } $requiredGB = [math ]::Ceiling($requiredBytes / 1 GB)Write-Host "本次运行预计还需要:$requiredGB GB" if ($drive .Free -lt $requiredBytes ) { throw "空间不足。至少还需要 $requiredGB GB。" } if ($drive .Free -lt 70 GB) { Write-Warning "可用空间少于 70GB,安装后请及时清理下载缓存。" } if (Get-Command nvidia-smi .exe -ErrorAction SilentlyContinue) { & nvidia-smi .exe --query-gpu =name,memory.total --format =csv,noheader } else { Write-Warning "没有找到 nvidia-smi。请确认 NVIDIA 驱动已经安装。" } Write-Step "创建目录" New-Item -ItemType Directory -Force -Path $InstallRoot , $AppRoot , $DownloadsRoot | Out-Null Write-Step "下载并解压 ComfyUI" $comfyZip = Join-Path $DownloadsRoot "ComfyUI-master.zip" if (-not (Test-Path -LiteralPath (Join-Path $ComfyRoot "main.py" ))) { Download-File ` -Url "https://github.com/Comfy-Org/ComfyUI/archive/refs/heads/master.zip" ` -Destination $comfyZip $comfyExtract = Join-Path $DownloadsRoot "comfy_extract" if (Test-Path -LiteralPath $comfyExtract ) { Remove-Item -LiteralPath $comfyExtract -Recurse -Force } Expand-Archive -LiteralPath $comfyZip -DestinationPath $comfyExtract -Force Move-Item -LiteralPath (Join-Path $comfyExtract "ComfyUI-master" ) -Destination $ComfyRoot } else { Write-Host "ComfyUI 已存在,跳过解压。" } Write-Step "创建 Python 虚拟环境" if (-not (Test-Path -LiteralPath $VenvPython )) { & py.exe -3 .12 -m venv $VenvRoot } & $VenvPython -m pip install --upgrade pip Write-Step "安装 PyTorch cu130 和 ComfyUI 依赖" & $VenvPython -m pip install --upgrade torch torchvision torchaudio --index-url "https://download.pytorch.org/whl/cu130" & $VenvPython -m pip install -r (Join-Path $ComfyRoot "requirements.txt" ) New-Item -ItemType Directory -Force -Path $DiffusionRoot , $TextEncoderRoot , $VaeRoot , $LoraRoot | Out-Null Write-Step "下载 MiniMax H3 主模型(约 20.97GB)" Download-File ` -Url "$HfHost /Comfy-Org/MiniMax-H3/resolve/main/diffusion_models/minimax_h3_fl2va_pruned_int8_convrot.safetensors" ` -Destination (Join-Path $DiffusionRoot "minimax_h3_fl2va_pruned_int8_convrot.safetensors" ) ` -ExpectedSize 20970379616 Write-Step "下载 32B NVFP4 文本编码器(约 15.69GB)" Download-File ` -Url "$HfHost /Comfy-Org/MiniMax-H3/resolve/main/text_encoders/qwen3vl_32b_minimax_h3_nvfp4_awq.safetensors" ` -Destination (Join-Path $TextEncoderRoot "qwen3vl_32b_minimax_h3_nvfp4_awq.safetensors" ) ` -ExpectedSize 15687142551 Write-Step "下载视频和音频 VAE" Download-File ` -Url "$HfHost /Comfy-Org/MiniMax-H3/resolve/main/vae/minimax_h3_video_vae_fp16.safetensors" ` -Destination (Join-Path $VaeRoot "minimax_h3_video_vae_fp16.safetensors" ) ` -ExpectedSize 5207808496 Download-File ` -Url "$HfHost /Comfy-Org/MiniMax-H3/resolve/main/vae/minimax_h3_audio_vae_fp32.safetensors" ` -Destination (Join-Path $VaeRoot "minimax_h3_audio_vae_fp32.safetensors" ) ` -ExpectedSize 605254808 Write-Step "安装 MiniMax H3 Turbo 节点" $turboRoot = Join-Path $ComfyRoot "custom_nodes\ComfyUI-MiniMax-H3-Turbo" if (-not (Test-Path -LiteralPath (Join-Path $turboRoot "__init__.py" ))) { $turboZip = Join-Path $DownloadsRoot "ComfyUI-MiniMax-H3-Turbo-main.zip" Download-File ` -Url "https://github.com/Larryvrh/ComfyUI-MiniMax-H3-Turbo/archive/refs/heads/main.zip" ` -Destination $turboZip $turboExtract = Join-Path $DownloadsRoot "turbo_extract" if (Test-Path -LiteralPath $turboExtract ) { Remove-Item -LiteralPath $turboExtract -Recurse -Force } Expand-Archive -LiteralPath $turboZip -DestinationPath $turboExtract -Force Move-Item ` -LiteralPath (Join-Path $turboExtract "ComfyUI-MiniMax-H3-Turbo-main" ) ` -Destination $turboRoot } else { Write-Host "Turbo 节点已存在,跳过安装。" } Write-Step "下载 Turbo v4 step600 EMA LoRA" $turboLora = Join-Path $LoraRoot "minimax_h3_turbo_v4_step600_ema.safetensors" Download-File ` -Url "$HfHost /larryvrh/MiniMax-H3-Turbo-Lora/resolve/main/minimax_h3_turbo_v4_step600_ema.safetensors" ` -Destination $turboLora ` -ExpectedSize 779849816 $turboHash = (Get-FileHash -LiteralPath $turboLora -Algorithm SHA256).Hash$expectedTurboHash = "5F3A626CD72C93A8B9318D6760C510BC5092D2AB13AABA1F932C5BAB07A416D3" if ($turboHash -ne $expectedTurboHash ) { throw "Turbo LoRA SHA-256 校验失败。实际:$turboHash " } Write-Step "生成启动和环境检查脚本" $startBat = @' @echo off setlocal cd /d D:\AI\MiniMax-H3\app\ComfyUI-master echo Starting MiniMax H3 on RTX 4060 Ti 8GB... D:\AI\MiniMax-H3\venv\Scripts\python.exe main.py --auto-launch --lowvram --disable-pinned-memory --preview-method none pause '@ Set-Content -LiteralPath (Join-Path $InstallRoot "start_minimax_h3.bat" ) -Value $startBat -Encoding ascii$checkBat = @' @echo off setlocal D:\AI\MiniMax-H3\venv\Scripts\python.exe -c "import torch; print('Torch:', torch.__version__); print('CUDA:', torch.cuda.is_available()); print('GPU:', torch.cuda.get_device_name(0) if torch.cuda.is_available() else 'NONE'); print('VRAM GB:', round(torch.cuda.get_device_properties(0).total_memory/1024**3, 2) if torch.cuda.is_available() else 0)" pause '@ Set-Content -LiteralPath (Join-Path $InstallRoot "check_minimax_h3.bat" ) -Value $checkBat -Encoding asciiWrite-Step "最终检查" & $VenvPython -c "import torch; print('Torch:', torch.__version__); print('CUDA:', torch.cuda.is_available()); print('GPU:', torch.cuda.get_device_name(0) if torch.cuda.is_available() else 'NONE')" Write-Host "`n安装完成。双击下面的文件启动:" -ForegroundColor GreenWrite-Host (Join-Path $InstallRoot "start_minimax_h3.bat" ) -ForegroundColor GreenWrite-Host "首次启动后打开 http://127.0.0.1:8188"
打开 PowerShell,运行:
1
2
Set-ExecutionPolicy -Scope Process Bypass& "保存脚本的目录\install_minimax_h3_4060ti_8gb.ps1"
模型下载超过 43GB,第一次执行可能要很久。脚本显示某个大文件正在下载时,不要关闭窗口。网络断开也没关系,再运行一次会从已有文件继续。
如果 Hugging Face 直连太慢,可以在脚本开头把:
1 $HfHost = "https://huggingface.co"
改成你信任的镜像地址。文件体积检查仍会保留,Turbo LoRA 还会额外校验 SHA-256。
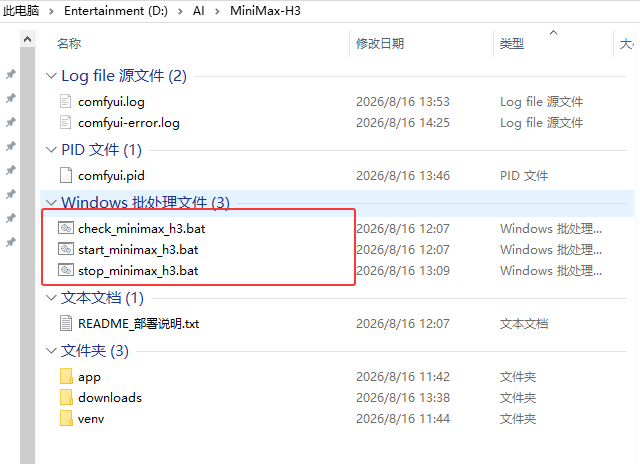
04|安装结束后怎么检查 脚本结束后会生成:
1
2
D:\AI\MiniMax-H3\start_minimax_h3.bat D:\AI\MiniMax-H3\check_minimax_h3.bat
先双击 check_minimax_h3.bat。我这里的输出是:
1
2
3
4
Torch: 2.13.0+cu130 CUDA: True GPU: NVIDIA GeForce RTX 4060 Ti VRAM GB: 8.0
再检查模型目录:
1
2
3
4
5
models\diffusion_models\minimax_h3_fl2va_pruned_int8_convrot.safetensors models\text_encoders\qwen3vl_32b_minimax_h3_nvfp4_awq.safetensors models\vae\minimax_h3_video_vae_fp16.safetensors models\vae\minimax_h3_audio_vae_fp32.safetensors models\loras\minimax_h3_turbo_v4_step600_ema.safetensors
最后双击 start_minimax_h3.bat。启动命令已经带上这几个参数:
1
2
3
--lowvram --disable-pinned-memory --preview-method none
浏览器会打开:
日志中出现下面几行,就说明显卡、Dynamic VRAM 和 Turbo 节点都加载了:
1
2
3
4
Device: cuda:0 NVIDIA GeForce RTX 4060 Ti DynamicVRAM support detected and enabled ComfyUI-MiniMax-H3-Turbo Starting server
05|先用原版工作流跑一次 在 ComfyUI 中打开:
1 Workflow → Browse Workflow Templates
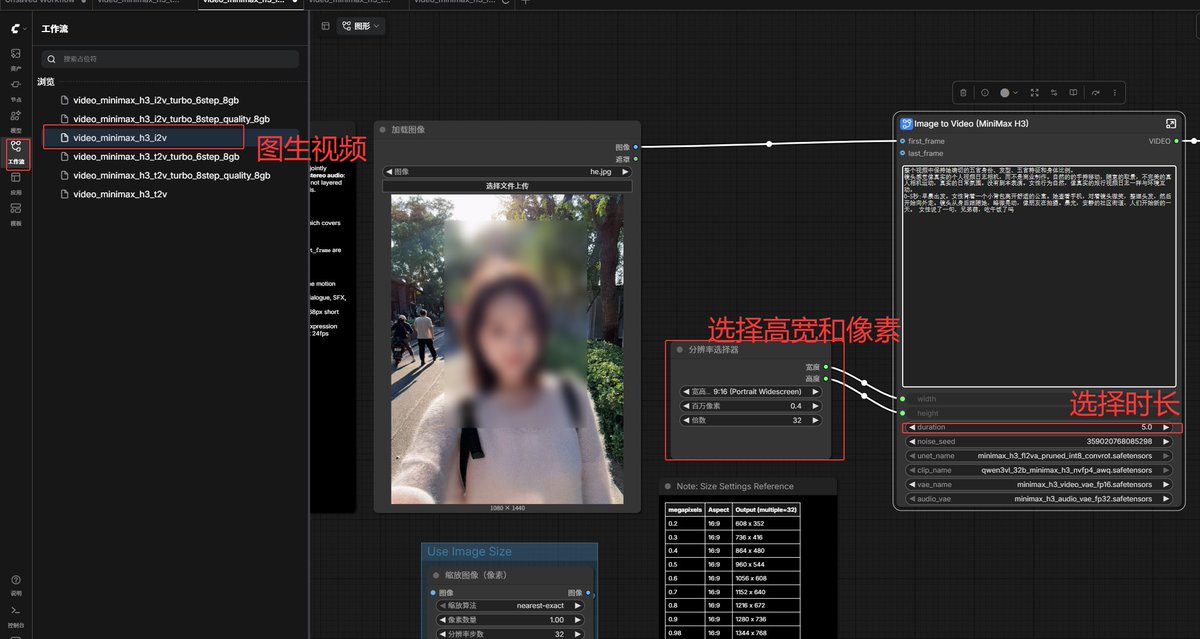
搜索 MiniMax H3,载入官方 T2V 或 I2V 工作流。第一次测试用:
1
2
3
4
608×352(0.2MP) 3~5秒 20步 Batch 1
我跑过的一次原版短片,20 步去噪约 191 秒,完整任务 216.88 秒。首次加载模型时还会多花一点时间。
原版能正常出片,再接 Turbo。以后即使 Turbo 工作流报错,也能排除基础模型、VAE 和环境本身的问题。
06|单独安装 Turbo 加速 如果你运行的是第三节的一键脚本,这一步已经完成。脚本会同时安装 Turbo 自定义节点和 v4 step600 EMA LoRA,不用再次下载。
检查下面两个文件是否存在:
1
2
D:\AI\MiniMax-H3\app\ComfyUI-master\custom_nodes\ComfyUI-MiniMax-H3-Turbo\__init__.py D:\AI\MiniMax-H3\app\ComfyUI-master\models\loras\minimax_h3_turbo_v4_step600_ema.safetensors
两个文件都在,就直接跳到第 07 节。
如果你已经有一套能运行 H3 的 ComfyUI,只想补装 Turbo,先关闭 ComfyUI,再按下面操作。
1. 安装 Turbo 自定义节点 从项目页下载 ZIP:
1 https://github.com/Larryvrh/ComfyUI-MiniMax-H3-Turbo/archive/refs/heads/main.zip
解压后,把文件夹改名为 ComfyUI-MiniMax-H3-Turbo,放到:
1 D:\AI\MiniMax-H3\app\ComfyUI-master\custom_nodes\
最终要能找到这个文件:
1 custom_nodes\ComfyUI-MiniMax-H3-Turbo\__init__.py
2. 下载 Turbo LoRA 在 PowerShell 中运行:
1
2
3
curl.exe -L --fail --retry 5 --retry-delay 3 -C - ` -o "D:\AI\MiniMax-H3\app\ComfyUI-master\models\loras\minimax_h3_turbo_v4_step600_ema.safetensors" ` "https://huggingface.co/larryvrh/MiniMax-H3-Turbo-Lora/resolve/main/minimax_h3_turbo_v4_step600_ema.safetensors"
文件约 744MB。下载后可以校验 SHA-256:
1
2
3
Get-FileHash ` "D:\AI\MiniMax-H3\app\ComfyUI-master\models\loras\minimax_h3_turbo_v4_step600_ema.safetensors" ` -Algorithm SHA256
正确结果应为:
1 5F3A626CD72C93A8B9318D6760C510BC5092D2AB13AABA1F932C5BAB07A416D3
重新启动 ComfyUI。日志中出现 ComfyUI-MiniMax-H3-Turbo,节点搜索里能找到 MiniMax-H3 Turbo LoRA 和 MiniMax-H3 Turbo Sampler,说明安装成功。
07|接好 Turbo 工作流并调参数 原来的官方 T2V、I2V 工作流仍然能用,但不会自动加速。Turbo 也不能只把 steps 从 20 改成 8,模型和采样器要按下面的方式连接:
1
2
3
4
5
6
7
8
9
Load Diffusion Model ↓ MiniMax-H3 Turbo LoRA ├────────→ Basic Guider └────────→ Basic Scheduler MiniMax-H3 Turbo Sampler ↓ SamplerCustomAdvanced
先用这组参数:
1
2
3
4
5
LoRA:minimax_h3_turbo_v4_step600_ema.safetensors strength:1.0 scheduler:simple steps:6~8 denoise:1.0
图生视频还要把 LoadImage 接到 MiniMaxH3ImageToVideo 的 first_frame。
4060 Ti 8GB 建议从 608×352、3~5 秒、8 步开始。只想快速看构图时可以用 6 步;准备保留的成片用 8 步更稳。步数继续往上加,速度会变慢,但画质通常不会按比例提高。
时长不要一上来改成 12 秒。视频时长增加后,帧数、VAE 解码量和显存搬运都会跟着上涨,8GB 显存尤其明显。先用短片确认提示词、动作和镜头,再把满意的版本延长,比直接反复生成 12 秒省时间。
参考来源
ComfyUI 官方仓库https://github.com/Comfy-Org/ComfyUI
ComfyUI Windows 本地安装文档https://docs.comfy.org/installation/desktop/windows
ComfyUI 工作流模板说明https://docs.comfy.org/interface/features/template
MiniMax H3 官方模型仓库https://huggingface.co/Comfy-Org/MiniMax-H3
MiniMax H3 Turbo 自定义节点https://github.com/Larryvrh/ComfyUI-MiniMax-H3-Turbo
MiniMax H3 Turbo LoRA 权重https://huggingface.co/larryvrh/MiniMax-H3-Turbo-Lora
ComfyUI Dynamic VRAM 公告https://github.com/Comfy-Org/ComfyUI/discussions/12699